How to Grout Tile Floor
April 8th 2023
Grouting a tile floor may seem like a daunting task, but with the right tools and techniques, it can be a simple and rewarding DIY project. Whether you're renovating your bathroom, kitchen, or any other room with tile flooring, knowing how to grout tile floor properly can help you achieve a professional-looking finish that will last for years to come.
In this article, we will guide you through the process of grouting tile floors, from choosing the right type of grout to applying it evenly and sealing it for protection. We will also answer some of the most frequently asked questions related to grouting tile floors, so you can feel confident in your DIY skills.
When to Grout a Tile Floor
Timing is crucial when it comes to grouting a tile floor. You should wait until the tile adhesive has fully cured, which can take anywhere from 24 hours to several days depending on the type of adhesive and the environment. Grouting too soon can cause the grout to crack or shrink as the tile settles.
How to Grout Tile Floor
Now that you've chosen the right type of grout and taken the necessary safety measures, it's time to start grouting your tile floor. Here's a step-by-step guide:
1. Choose a Grout Color
The first step in grouting tile floor is to choose a grout color that compliments the color and design of your tile. You can find grout in a wide range of colors. When it comes to choosing a grout color, there are a few things to keep in mind. You can either choose a grout color that matches the tiles closely, or you can choose a contrasting color to create a dramatic effect.
For example, if you have white subway tiles, you might choose a white or light gray grout color to create a seamless look. On the other hand, if you have colorful mosaic tiles, you might choose a contrasting grout color to highlight the individual tiles and create a bold, eye-catching look.
In addition to the color of your tiles, you also want to consider the size of the grout lines. If you have large gaps between your tiles, you might want to choose a grout color that is similar to the color of the tiles to create a cohesive look. If you have small gaps, you might want to choose a lighter grout color to make the gaps less noticeable.
Finally, it's important to consider the overall style and feel of the room when choosing a grout color. If you have a modern, minimalist bathroom, you might choose a white or gray grout color to create a sleek, clean look. If you have a rustic, farmhouse-style kitchen, you might choose a beige or brown grout color to create a warm, cozy feel.
2. Apply the Grout
Once you have chosen your grout color, the next step is to apply the grout. Follow these steps for best results:
- Mix the grout according to the manufacturer's instructions, using a grout mixing paddle and a bucket.
- Use a grout float to apply the grout evenly to the tile floor, starting from the farthest corner of the room and working your way towards the door. Hold the float at a 45-degree angle and apply the grout in a diagonal motion, pressing it firmly into the gaps between the tiles.
- Make sure to work in small sections to prevent the grout from drying out before you can clean it off.
- Once you have applied the grout, use the edge of the grout float to scrape off any excess grout from the surface of the tiles.
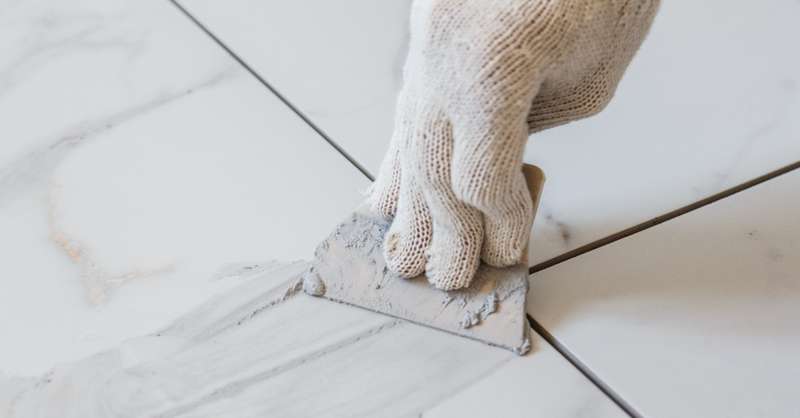
3. Hold the Grout Float at a 90-Degree Angle
To ensure that the grout fills in the gaps between the tiles evenly, hold the grout float at a 90-degree angle and run it diagonally across the tiles, pressing the grout firmly into the gaps. Make sure to remove any excess grout from the float after each pass.
4. Wipe the Tile With a Damp Sponge
After you have applied the grout, use a damp sponge to wipe the excess grout off the surface of the tiles. Work in a circular motion, making sure to remove all the grout from the surface of the tiles without disturbing the grout in the gaps. Rinse the sponge frequently and change the water as needed.
5. Use a Damp Cloth to Remove the Haze
Once you have wiped off the excess grout, there may be a haze left on the surface of the tiles. Use a damp cloth to wipe off the haze, working in a circular motion. Make sure to rinse the cloth frequently and change the water as needed.
6. Apply the Sealer
After the grout has cured for at least 24 hours, apply a grout sealer to protect it from moisture and stains. Use a paintbrush or a roller to apply the sealer evenly to the grout, making sure to cover all the gaps between the tiles. Follow the manufacturer's instructions for drying time and reapplication.
7. Caulk Along Baseboards and Walls
To prevent water damage, use a caulk gun to apply a silicone caulk along the gap between the tile floor and the baseboards or walls. Make sure to smooth out the caulk with a damp finger or a caulk smoothing tool for a neat finish.
Type of Tile Grout to Use
The first step in grouting tile floor is to choose the right type of grout for your specific tile and the desired finish. There are two main types of grout: sanded and unsanded.
Sanded grout is typically used for tile flooring with larger gaps between the tiles, as it contains sand particles that help fill in the gaps and provide a stronger bond. It is also more durable and resistant to cracking and shrinking, making it ideal for high-traffic areas.
Unsanded grout, on the other hand, is used for tile flooring with smaller gaps, as it does not contain sand particles and can be applied more smoothly. It is also less likely to scratch delicate tiles such as marble or glass, making it a popular choice for decorative tiles.
Dry vs. Premixed Grout Mix
Another factor to consider when choosing grout is whether to use a dry or premixed grout mix. Dry grout mix is more cost-effective and can be mixed to your desired consistency, but it requires more effort to prepare and may not be as consistent in color as premixed grout. Premixed grout, on the other hand, is more convenient and consistent in color, but it may be more expensive and have a shorter shelf life.
Epoxy Tile Grout and Brick Tile Grout
In addition to sanded and unsanded grout, there are other types of grout that may be more suitable for specific tiles or environments. Epoxy tile grout, for example, is a two-part grout that is highly resistant to stains and moisture, making it ideal for bathrooms, kitchens, and other areas with high moisture content. Brick tile grout, on the other hand, is a special type of grout that is designed for use with thin brick tiles and provides a rustic, textured finish.
Safety Considerations while Tile Grout Installation
Before you start grouting tile floor, it's important to take some safety precautions. Wear gloves to protect your hands from the chemicals in the grout, eye protection to prevent splashes, and a respirator to avoid inhaling dust or fumes.
Conclusion
Grouting wall tile and floors may seem intimidating, but with the right tools and techniques, it can be a simple and rewarding DIY project. Whether you're renovating your bathroom, kitchen, or any other room with tile flooring, knowing how to grout tile floor properly can help you achieve a professional-looking finish that will last for years to come.
By following the steps outlined in this article, choosing the right type of grout, and taking the necessary safety precautions, you can ensure that your tile floor looks great and stays protected from moisture and stains. And with the answers to some of the most frequently asked questions about grouting tile floors, you can feel confident in your DIY skills and tackle this project with ease.
FAQs:
1. Is grout necessary between tiles?
Yes, grout is necessary between tiles to fill in the gaps and provide a stable foundation for the tiles. It also helps prevent moisture and dirt from getting between the tiles and damaging the subfloor.
2. Can you put new grout over old grout?
It is not recommended to put new grout over old grout, as the new grout may not adhere properly and may crack or shrink. Instead, remove the old grout and clean the gaps before applying new grout.
3. What is the best way to put grout in tiles?
The best way to put grout in tiles is to use a grout float and hold it at a 90-degree angle to the tiles. Apply the grout diagonally and press it firmly into the gaps, making sure to remove any excess grout from the surface of the tiles with the edge of the float.
4. How long does it take for grout to dry?
Grout typically takes 24 to 48 hours to dry, depending on the type of grout and the environment. Make sure to follow the manufacturer's instructions for drying time and avoid walking on the tile floor or exposing it to water until the grout is fully cured.
5. Is tile grout waterproof?
Tile grout is not waterproof, but it can be made water-resistant by applying a grout sealer. This helps protect the grout from moisture and stains, but it is still important to clean up spills and moisture as soon as possible to prevent damage to the grout.
6. Which grout is best for the bathroom?
Epoxy tile grout is the best type of grout for the bathroom, as it is highly resistant to stains and moisture. It also provides a smooth, easy-to-clean surface that is ideal for bathrooms and other areas with high moisture content.
7. What damages tile grout?
Grouting wall tile is important as tile grout can be damaged by moisture, dirt, and grime, as well as by heavy foot traffic and abrasive cleaning products. To protect your tile grout, make sure to seal it regularly and clean it with mild, non-abrasive cleaners.