How to apply tile adhesive correctly: Step-by-Step Guide
April 1st 2024
Tiling transforms spaces with its beauty and unmatched durability. Whether you're an experienced professional or a tiling DIYer, understanding the art of adhesive application is critical for a flawless finish. In this guide, we will walk you through the process of applying tile adhesive correctly to ensure long-lasting results.
How to apply tile adhesive correctly?
It is the 10-step process to apply tile adhesive correctly that ensures your tiles stay firmly in place for years:
Step 1: Prepare Your Space for Perfection
Step 2: Assemble Your Tiling Toolkit
Step 3: Create the Perfect Adhesive
Step 4: Spread the Adhesive with Precision
Step 5: Employ Spacers for Uniformity
Step 6: Verify Alignment for a Flawless Finish
Step 7: Clean Excess Adhesive
Step 8: Allow to Set
Step 9: Grout for Protection and Polished Perfection
Step 10: Final Check
Let's dive into the details of each step and transform your space with a professionally finished tiled surface.
Step 1: Prepare Your Space for Perfection
A successful tiling project begins with a pristine foundation.
Precisely clean your surface, removing all debris, dust, and irregularities.
A smooth, debris-free surface maximises the adhesive's bonding strength, guaranteeing a long-lasting, secure hold for your tiles.
Also, check for levelness. A level surface prevents uneven tiles, ensuring a polished and aesthetically pleasing appearance while avoiding potential cracking.
Investing in this preparation saves you from future frustration.
Step 2: Assemble Your Tiling Toolkit
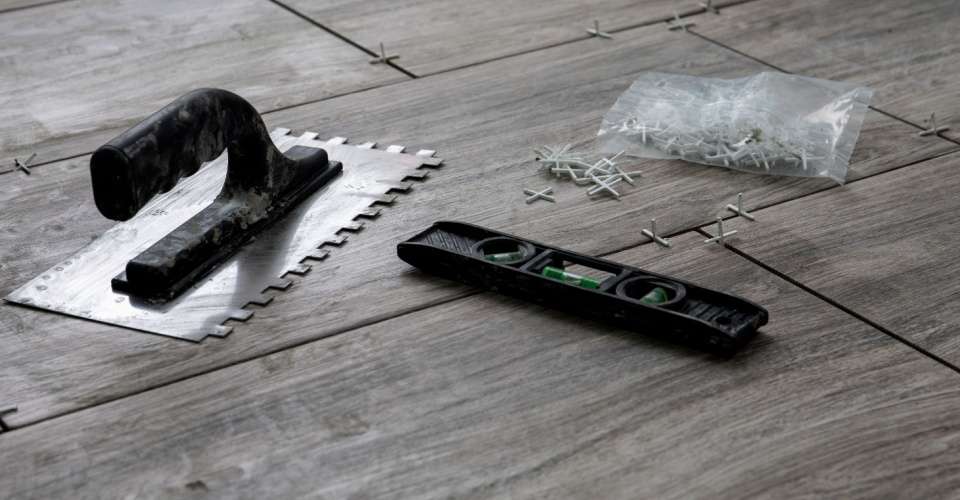
With a prepared surface, it's time to gather your essential equipment.
Proper tools streamline the process and ensure accuracy.
Before we delve into the art of mixing adhesive, let's confirm you have the following:
- Your Adhesive of Choice: Select a tile adhesive tailored to your tile type and surface.
- A Mixing Bucket: It is your vessel for creating the perfect adhesive blend.
- A Mixing Paddle (or Drill with Mixing Attachment): Your tool for achieving a smooth, lump-free consistency.
- A Notched Trowel: This specialised tool evenly distributes the adhesive, creating grooves for a secure grip on your tiles.
- Protective Gear: Safety first! Gloves and eye protection are non-negotiable.
Keep in mind that tile adhesive begins to set quickly. Plan to mix enough for a manageable area, ensuring you can work efficiently.
Step 3: Create the Perfect Adhesive
This step is where the tiling magic begins.
Begin by closely reading the instructions on your adhesive packaging for precise water ratios and mixing techniques.
Stir continuously and slowly incorporate the adhesive powder into the water in your mixing bucket.
For optimal results, utilise a mixing paddle or a drill with a mixing attachment.
It should have a creamy, lump-free consistency similar to a peanut butter spread.
A carefully mixed adhesive guarantees a robust bond and flawless tile installation.
The even consistency ensures a proper hold, enhancing the longevity and visual appeal of your completed project.
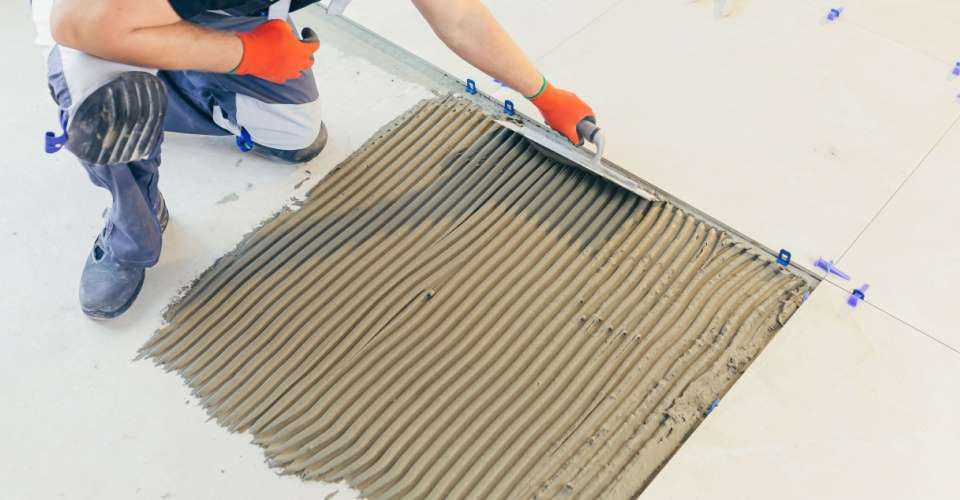
Step 4: Spread the Adhesive with Precision
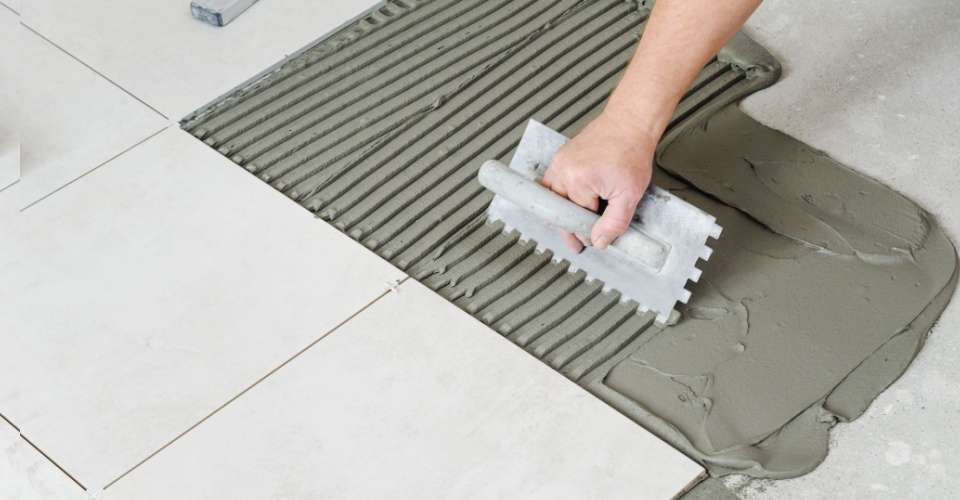
Now, let's put that carefully mixed adhesive to work.
Your notched trowel is the key to achieving an even layer of glue for a secure, professional tile installation.
The trowel's notches create those essential ridges, providing the tiles with an optimal surface for adhesion. Think of this process as building a textured, welcoming foundation for your tiles.
Selecting a trowel with the appropriate notch size for your specific tiles is crucial. Consult your tile supplier for expert advice on choosing the right tool.
Apply the adhesive across a manageable section, angling your trowel for even distribution.
Upon placing the tiles, gently twist them in position.
It ensures complete coverage and eliminates potential air pockets that might compromise the bond.
Step 5: Employ Spacers for Uniformity
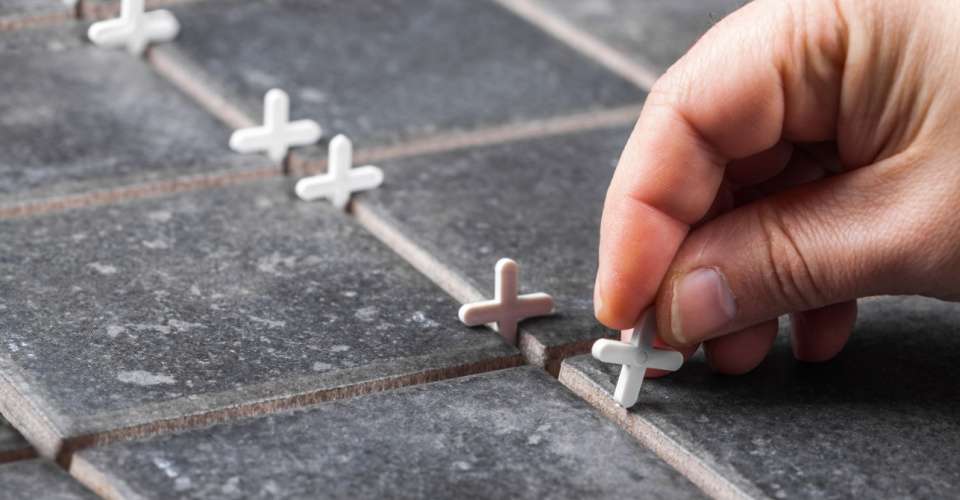
Spacers are indispensable for achieving perfectly spaced, visually appealing tiles.
Begin by applying a dollop of your carefully prepared adhesive at the intersection of your layout lines.
This technique will help maintain exceptional alignment throughout the project.
Stir your adhesive for freshness, aiming for a uniform layer approximately 3 millimetres thick.
Employing your notched trowel, delicately create textured ridges within the adhesive. These ridges provide an enhanced grip for your tiles.
To limit adhesive drying, focus on applying the adhesive across small, manageable sections.
Use a slight twisting motion to press the tiles into the adhesive. This action eliminates any trapped air, ensuring optimal adhesion and stability.
Step 6: Verify Alignment for a Flawless Finish
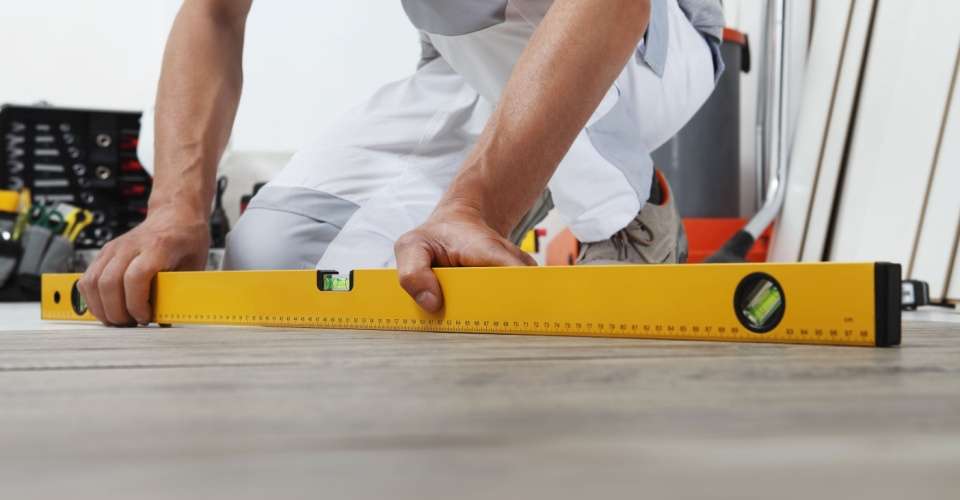
Achieving a flawless level of polished tile surface necessitates careful attention to alignment. Your spirit level is your tool for ensuring every tile is in perfect position.
As you set each tile, take a moment to check its levelness meticulously. The spirit level's bubble should rest precisely in the centre of its guide markings.
Before the adhesive fully sets, gently reposition the tile if the bubble is off-centre.
Level tiles are crucial for both aesthetics and functionality.
A level surface reduces the risk of tripping hazards and enhances visual appeal.
Additionally, precisely aligned tiles simplify the grouting process, ensuring a seamless and beautiful final result.
Invest those extra moments now to confirm the alignment of each tile.
Step 7: Clean Excess Adhesive
You have set your tiles, and they look great! However, there may be a bit of adhesive showing around the edges. No need to worry; this is normal.
With a damp sponge, gently remove any excess adhesive before it hardens fully.
Prompt removal of excess adhesive prevents the formation of unsightly hardened residue. It ensures a polished and professional final appearance.
Eliminating hardened adhesive simplifies the grouting process, providing a smooth and aesthetically pleasing outcome.
Maintaining a clean workspace contributes significantly to the longevity and beauty of your tiled surfaces.
Step 8: Allow to Set
The hardest part of the process is complete. Now, granting your adhesive sufficient time to cure fully is crucial.
Follow the manufacturer's instructions carefully regarding drying time, as it varies from adhesive to adhesive.
Allowing the adhesive to set ensures a rock-solid bond between your tiles and the underlying surface.
A fully cured adhesive prevents shifting or movement of the tiles, minimising the risk of unevenness and potential damage in the future.
Step 9: Grout for Protection and Polished Perfection
It's time to elevate your project to the next level. Grout serves as the final flourish, unifying individual tiles into a cohesive, visually stunning surface.
Grout enhances aesthetics and protects and prolongs your tile installation.
Select the ideal grout for your project, considering the desired aesthetic and the tiled area's intended use and environment.
High-quality grouts, such as the Saint-Gobain Weberjoint Thick Tile Grout or Asian Paints Berger SmartCare Tile Grout, offer exceptional durability and appeal.
Follow the manufacturer's directions for smooth, consistent results.
Applying the grout with a rubber float requires a steady hand. Working diagonally, generously fill joints between tiles.
Promptly remove excess grout with a damp sponge, again moving diagonally to maintain a clean finish.
After the grout has been partially cured, utilise a damp sponge to remove excess grout residue. Apply a diagonal motion to preserve clean joint lines.
Once fully cured, give your tiled surface a final polish with a dry cloth to remove any residual haze, revealing a flawlessly finished, gleaming masterpiece!
Step 10: Final Check
Take a moment to inspect the final product meticulously before celebrating your accomplishment. This last step solidifies a beautifully executed and secure finish.
With your spirit level, double-check the alignment of each tile. You can still make minor adjustments to get a perfect result.
Ensure the tiled surface is immaculate by carefully removing any lingering adhesive residue.
A gentle wipe-down promotes a pristine and polished presentation.
Take a moment to admire your work. Enjoy an overwhelming feeling of pride as you admire your tiled masterpiece.
FAQs
Q. How to apply tile adhesive to the wall?
Start by spreading tile adhesive evenly on a wall and pressing tiles firmly into place with a notched trowel.
Q. How to use tile adhesive on the floor?
The tiles should be firmly bonded to the floor surface using tile adhesive. The process is the same with walls.
Q. How to mix tile adhesive by hand?
If you wish to mix adhesive by hand, slowly add water while stirring the powder. It would be best to do this until you obtain a smooth, lump-free consistency.
Q. What is the tile adhesive mix ratio?
Tile adhesive mix ratios typically involve mixing a specific amount of water with adhesive powder. Follow the manufacturer's instructions for the best results.
Q. Can I mix tile adhesive with cement?
Mixing tile adhesive with cement is not recommended. It can compromise the bond between the tiles and the surface and alter the adhesive's properties.
Final Words
This guide outlines the steps to follow. By following these steps, you will have successfully navigated the process of applying tile adhesive. To make your work easier, always buy your tile adhesives and tools from FEPY, the leading e-commerce store in the UAE. FEPY has all premium construction materials and tools at the most cost-effective prices.
Now, take a moment to admire your handiwork and enjoy the satisfaction of a successful tiling project.